
| Note: This feature is available in SpatialKey Client for Windows applications, i.e., Map Analyst, Hazard Analyst and Accumulations. |
Labels in SpatialKey allow text descriptions to be visually added to a map. Use labels to draw attention to important elements on the map – they are great for use in screenshots, presentations, and shared dashboards.
Both data points and shapes can be labeled on a map. Labels can contain any text you choose and can even include values from the data points or shapes that you are labeling. Easily move labels around to position them around the data points or shapes as you see fit.
Labeling data points
Locations can have a label attached containing custom text and using the column/field values from within a record. To add this type of label, find and select a data point on your map. Once you click on the data point, a pod containing details of those records will appear. Click to “add label”. If the data point you selected has more than 1 record, you have the additional option of “label this cluster of [x] points” – this cluster of points is referred to as a hotspot cell.
- Select “Label this Point” to label only the point you have selected and are viewing in the location details pod.
- Select “Label this Cluster of [X] Points” to label all [X] points at that hotspot that are available in the location details pod.
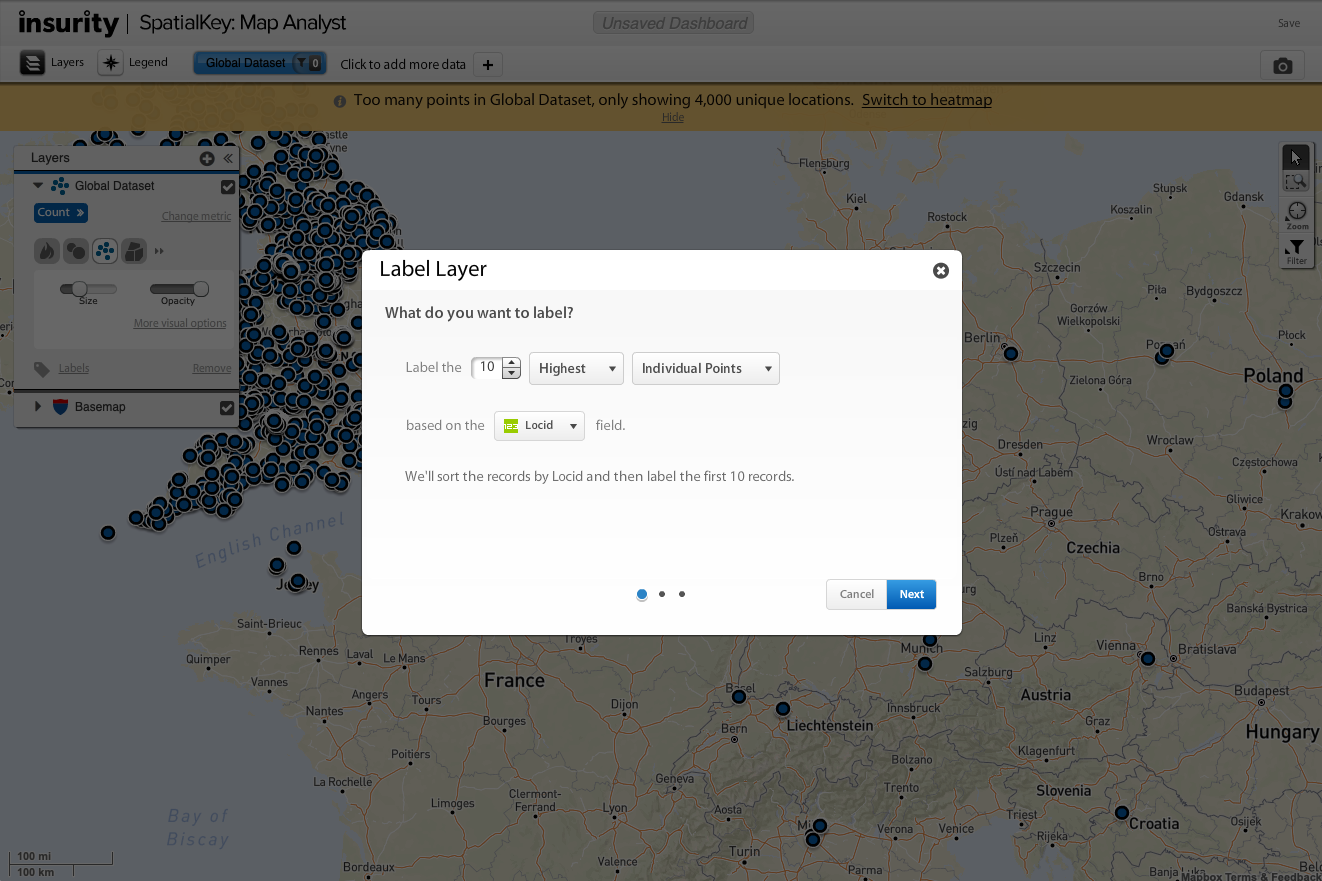
- Select “Label Multiple At Once” to create a rule for applying labels – e.g. label top 10 locations with greatest Total Insured value.

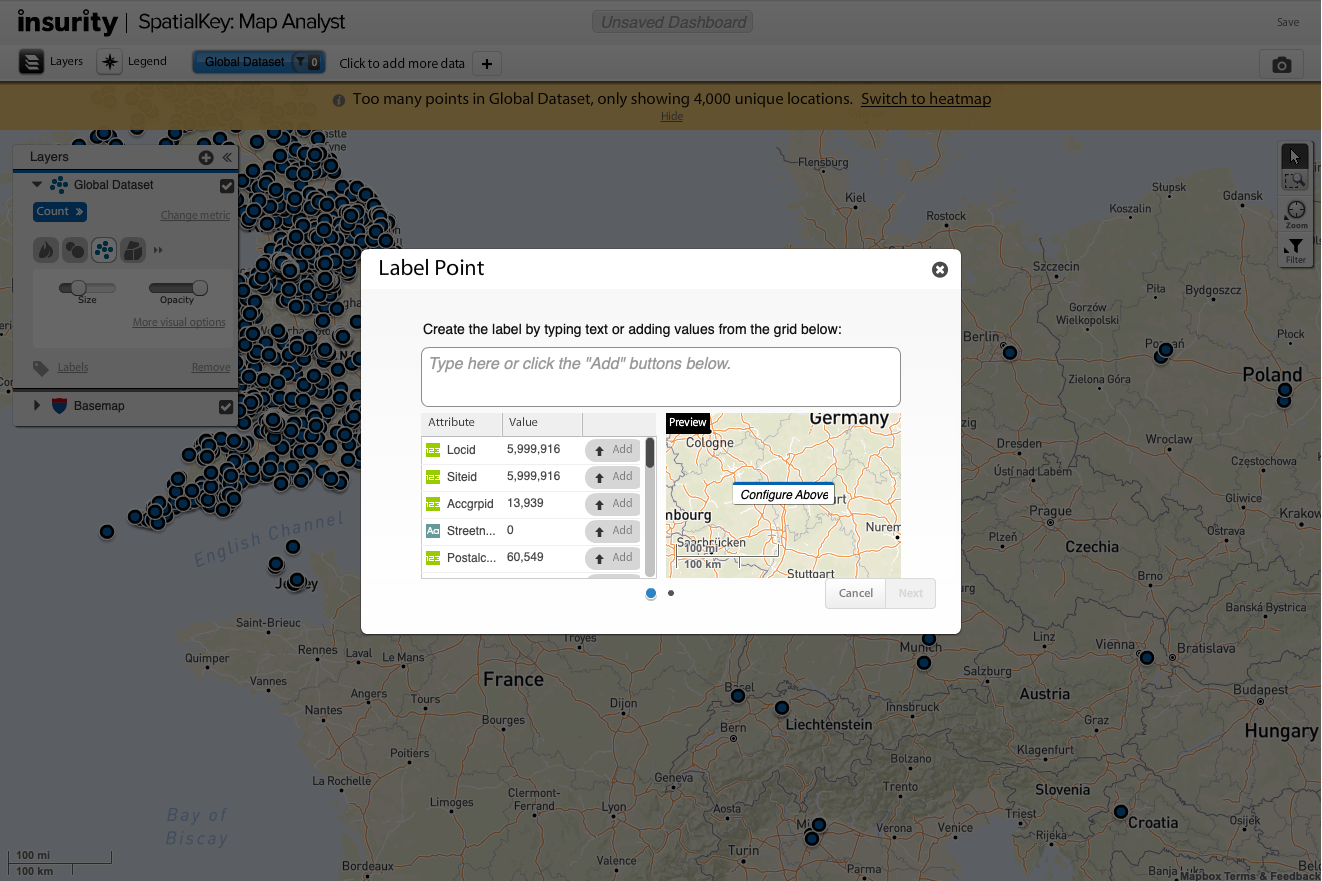
Label this Point
After selecting “Label this Point”, type free text in the text box to create a custom label. Select location attributes to “add” to the label – e.g. selecting to “add” Accgrpid will add the value in the accgrpid field for that location to the custom label.
Label this Cluster of points
If you selected “Label this Cluster of [X] Points”, aggregate values for locations at that hotspot are added to the label – e.g. selecting to “add” Eq Site Limit as a sum will add the value in the Eq Site Limit field for the [X] locations at that point to the custom label.
Label Multiple at Once
The option to “Label Multiple At Once” is slightly different from the above two options in that it doesn’t relate to the selected records in the location details pod. What you will do in this option is build a rule to apply labels. First, select how many labels to apply and how they will be applied. In the example below, we are labeling the top 10 records with the highest Eq Site Limit.
Another option worth noting is that you can change “individual points” to “hotspot cells” in order to label the top 10 hotspot cells that have the greatest sum of Eq Site Limit.

After creating the rule for how many labels to apply and how they will apply, you can customize how the label will appear.
Note: you can also access the option to label multiple at once through the data layer advanced options.

Note that when labeling multiple points at once by creating a rule, only points in view on the map are considered – e.g. if you want to label top 10 records by building value in your US dataset, you need to zoom out to view the entire US. If you were zoomed in to FL, the top 10 records by building value in Florida would be returned.
Label an arbitrary point
Arbitrary points can be added to your map through the layer manager. You can enter a label for this point before adding it to the map.

One the arbitrary point has been added to the map, you can remove the label by clicking on the “x” that appears when you hover over the label.
Or you can edit the point and label by clicking on the gear icon that appears when you hover over the point.

Labeling shapes
Shape based data can also have labels applied. There are a few different types of data we are referring to when we discuss the labeling of shapes:
- Shapefiles, either loaded into or created in SpatialKey, can have labels describing the shapes
- Thematically rendered point data can have labels describing the thematic shape. Data can be rendered thematically using the built in US Geography thematic maps (States, Postal Codes, Zip Codes) or by joining a point dataset with a shapefile.
- Custom shapes drawn on the map can have labels applied.
Applying a label to a shape is very similar to applying a label to a single point. Each shape is represented as a single record, similar to a single records in a CSV file.
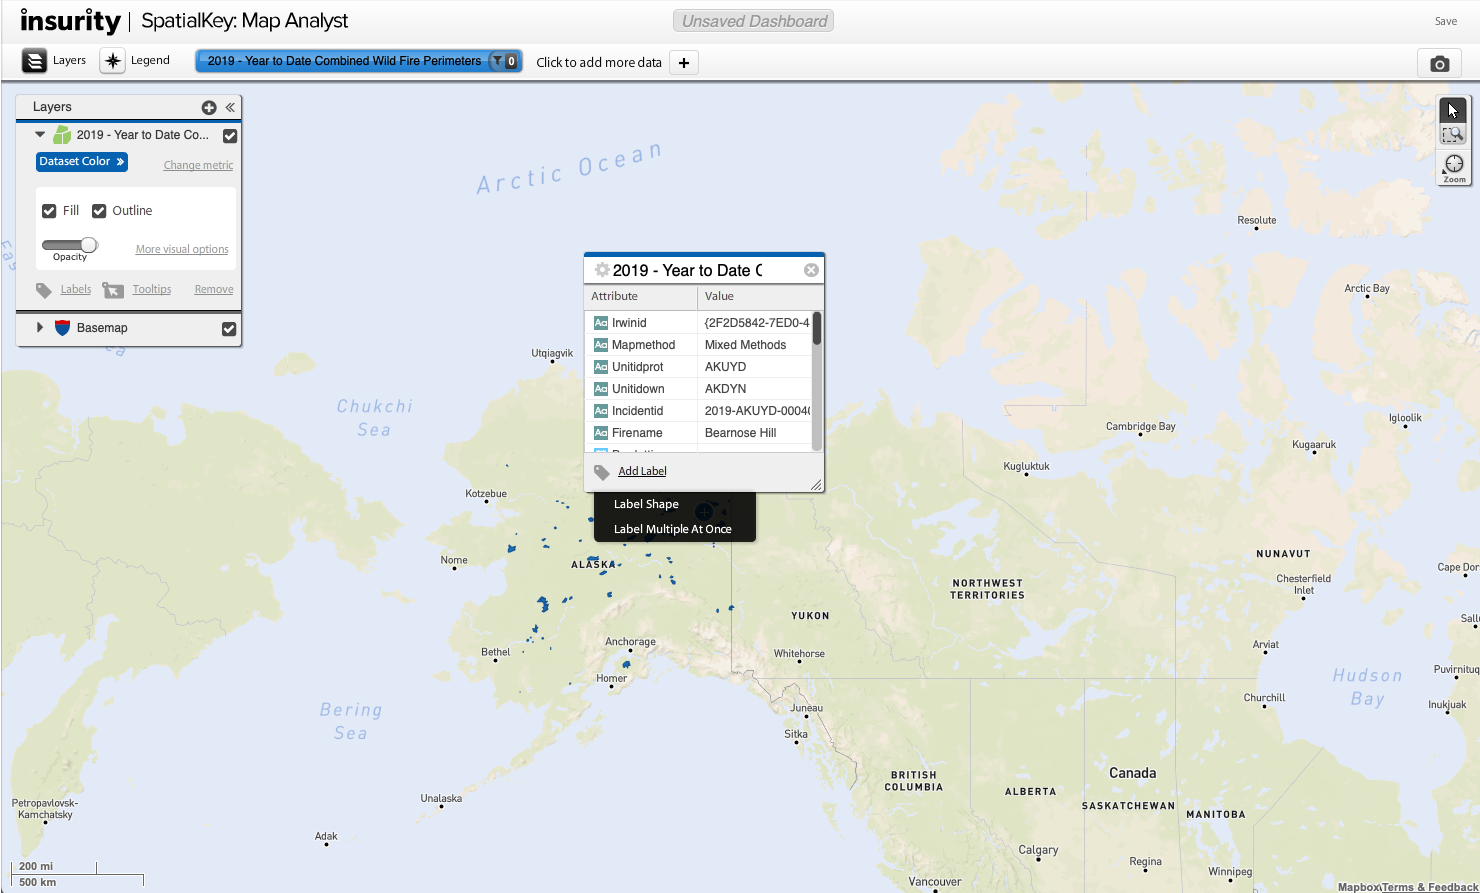
Once you click on a shape, a pod containing details of that shape will appear. Click to “add label”.
- Select “Label Shape” to label only the shape you have selected and are viewing in the details pod.
- Select “Label Multiple At Once” to create a rule for applying labels – e.g. label top 10 shapes with greatest Total Insured value.
Label Shape
After selecting “Label Shape”, type free text in the text box to create a custom label. Select shape attributes to “add” to the label – e.g. selecting to “add” Name will add the value in the name field for that shape to the custom label.

Label Multiple at Once
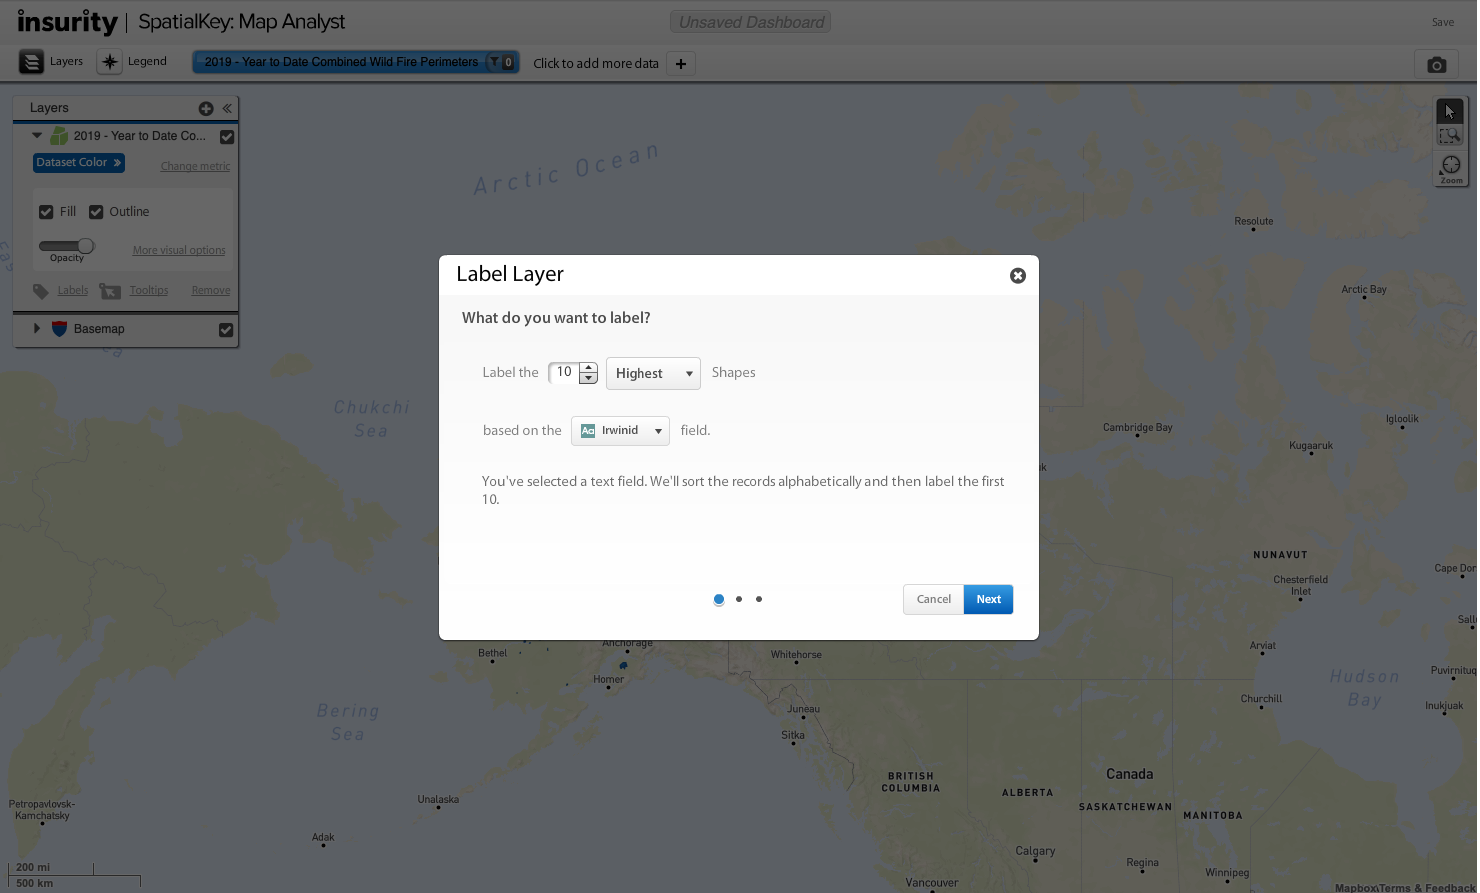
The option to “Label Multiple At Once” is slightly different from the above option in that it doesn’t relate to the selected shape in the details pod. What you will do in this option is build a rule to apply labels. First, select how many labels to apply and how they will be applied. In the example below, we are labeling the top 10 shapes with the highest “Aland” value.
Where this gets more interesting is when you have a point dataset joined with your shapefile – point data is displayed thematically. In this situation, you can select to label either the individual locations or the shape itself. In the example below, we are labeling the 10 shapes with the highest sum of Eq Site Limit for the locations that fall within the shapes.

After creating the rule for how many labels to apply and how they will apply, you can customize how the label will appear.
Note: you can also access the option to label multiple at once through the data layer advanced options.
Note that when labeling multiple points at once by creating a rule, only points in view on the map are considered – e.g. if you want to label top 10 records by building value in your US dataset, you need to zoom out to view the entire US. If you were zoomed in to FL, the top 10 records by building value in Florida would be returned.
Custom shapes drawn on the map
The last type of shape to discuss is a custom shape, drawn on your map using the SpatialKey drawing tools. This type of shape layer can be added to your map by selecting the 

Once custom shapes are added to your map, you can label them. This is done by labeling a single custom shape at a time. First, enter the “edit” mode for the shape, select the gear and then select “label shape”.

Type in a custom label for the shape. Note that there is no data associated directly with a custom shape so only custom text can be used for the label.

Editing, removing and repositioning labels
Editing and removing labels is easy, simply hover over a label and select the gear option to edit the label or select the “x” to remove the label for that specific location or shape.
There isn’t an option to edit the rule applied to label multiple locations or shapes at once. If you need to make a change to labels applied to multiple locations or shapes at once, you need to remove the labels and reapply them again. This can be done by entering the advanced settings for the layer.

Don’t forget that you can easily move the labels around to further customize how the labels appear on your dashboard. Simply drag and drop the label to a new position to move it.


That’s all there is to labeling individual points and shape files. Whether applying labels to one record or shape at a time or to multiple at once, SpatialKey makes it easy and allows for maximum customization of labels.